How To Install WordPress Websites on Amazon AWS Server using T2 Micro Instance for FREE !!!
Follow these easy steps to quickly set up and launch your WordPress Website on Amazon Aws Cloud Server
Before we start with our steps and process on how to launch a WordPress website and SSL setup on AWS for free today. Let me ask you a simple question, Why do we need or use WordPress to create a Website?
WordPress is one of the leading Website Platforms that allow users to easily create their Professional Website, whether E-Commerce, Display of Business Services, Entertainment, BroadCasting Information, or as simple as publishing blogs you name it and WordPress does it for you.
Why AMAZON AWS Cloud Hosting is the perfect choice for your WordPress Website?
When you talk about cloud service Amazon AWS Cloud Service provider ranks to the top.
Amazon Web Service was officially launched in the year 2006. Amazon EC2 Instances and Amazon S3 are the popular services among other services in Amazon AWS.
Here are the 5 reasons why AWS Cloud Hosting is best for your WordPress website.
- AWS Hosting is cheaper than any other hosting provider (You only pay for what you use)
- Faster website load speed, lower latency
- AWS gives you better easy to access Control Dashboard, Backup, User traffic management.
- AWS has less/lower Server downtime experience next to 0 or never.
- AWS has better customer service.
Now let us begin with the process of installing WordPress website on AWS Cloud Server
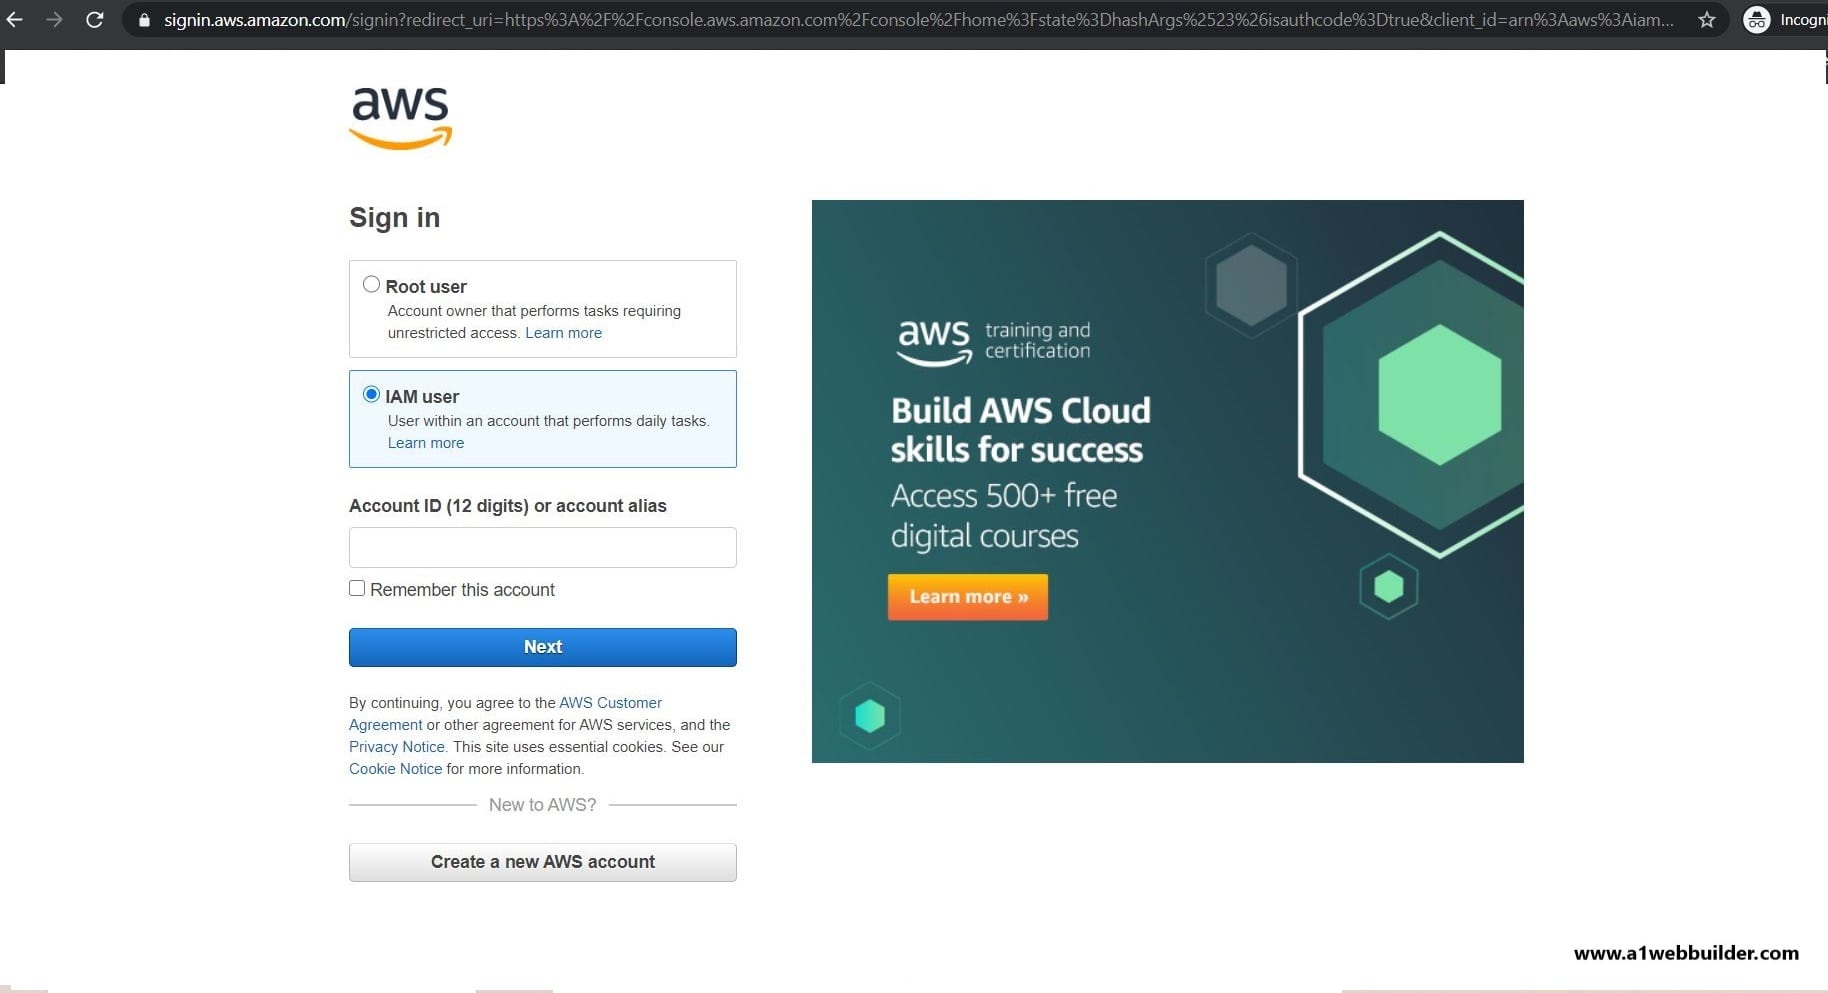
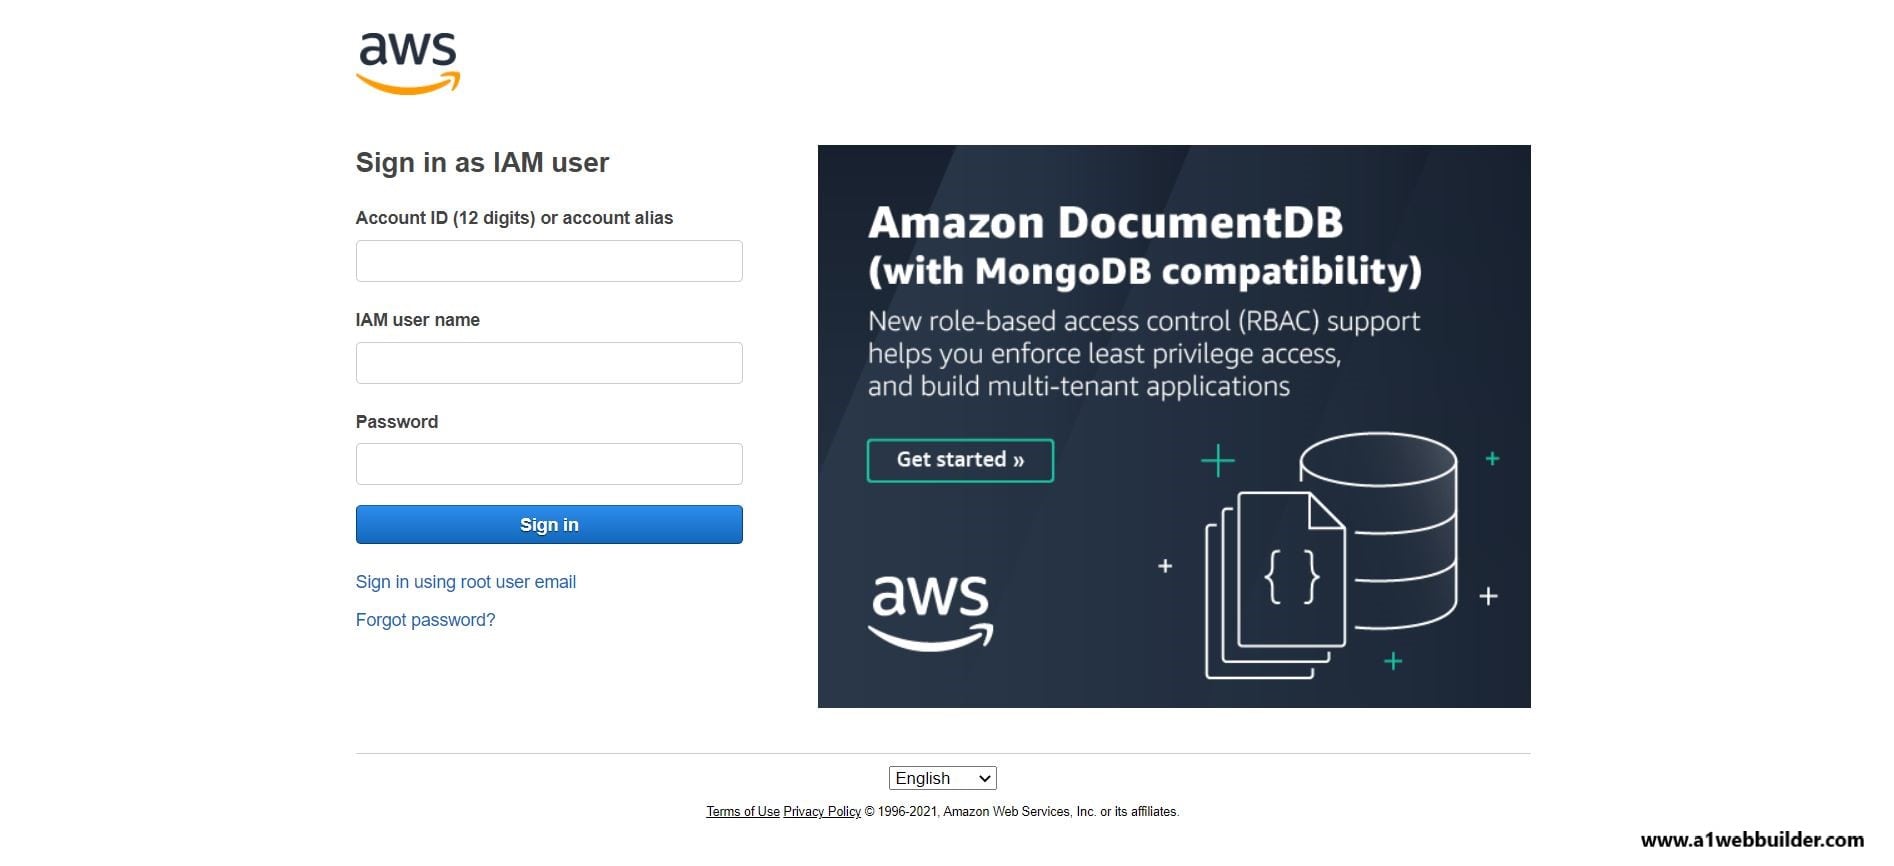
Step 1 Login/Sign In to your AWS Account
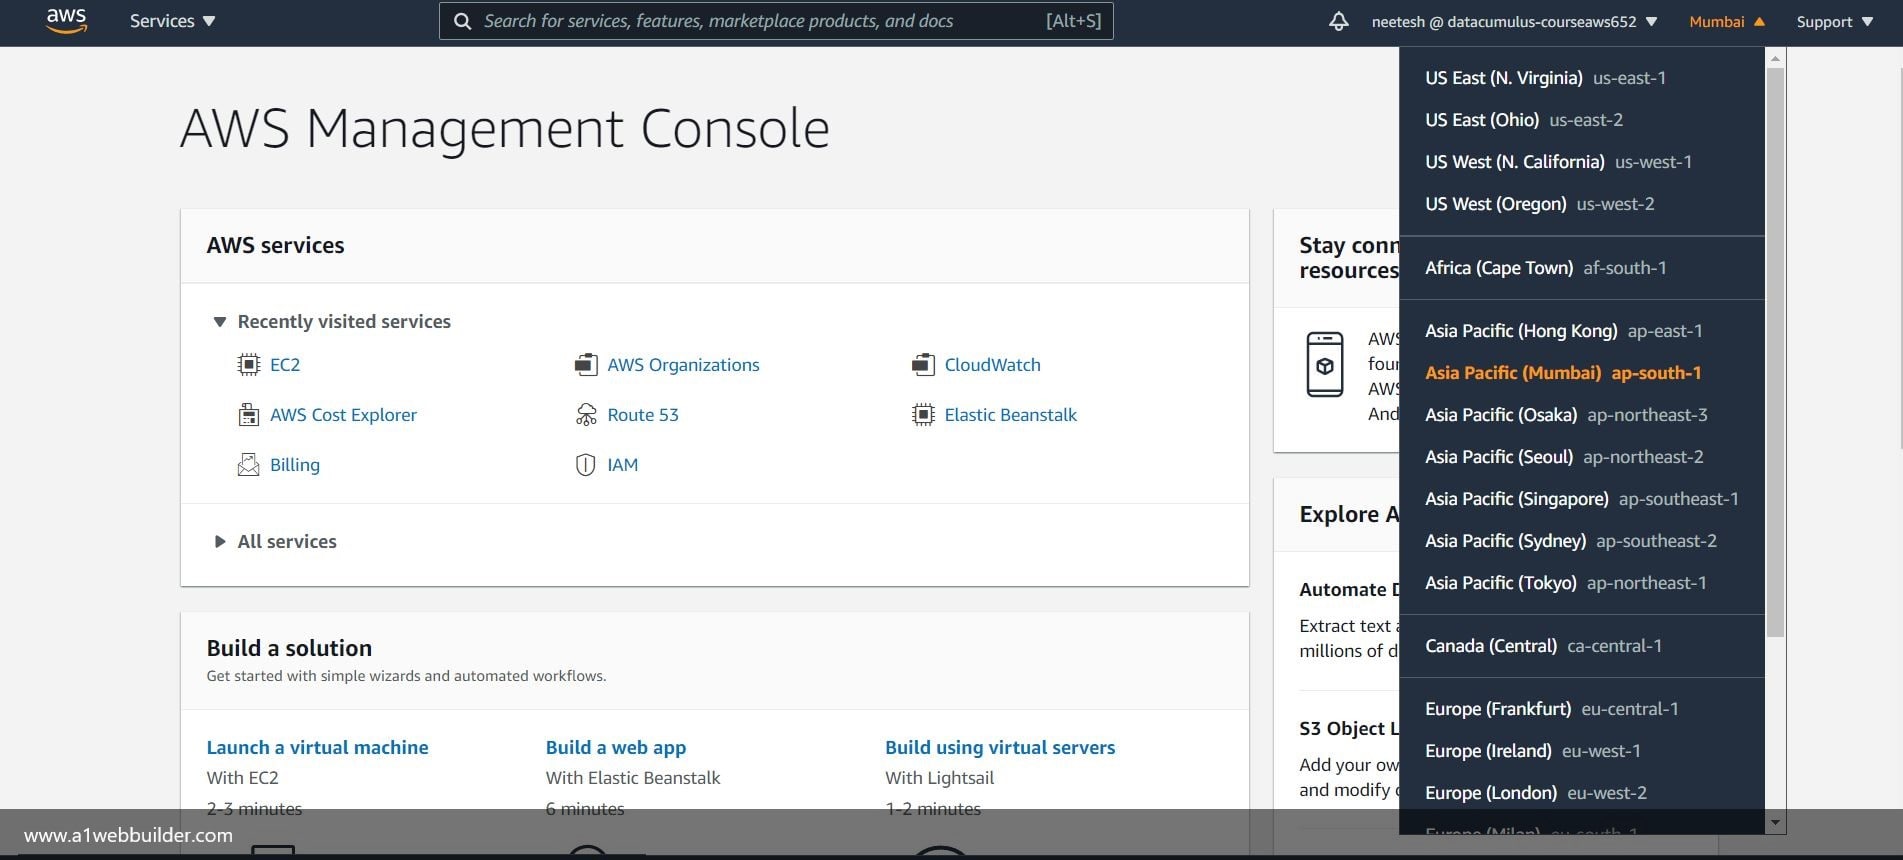
Step 2: Change your AWS Server Location
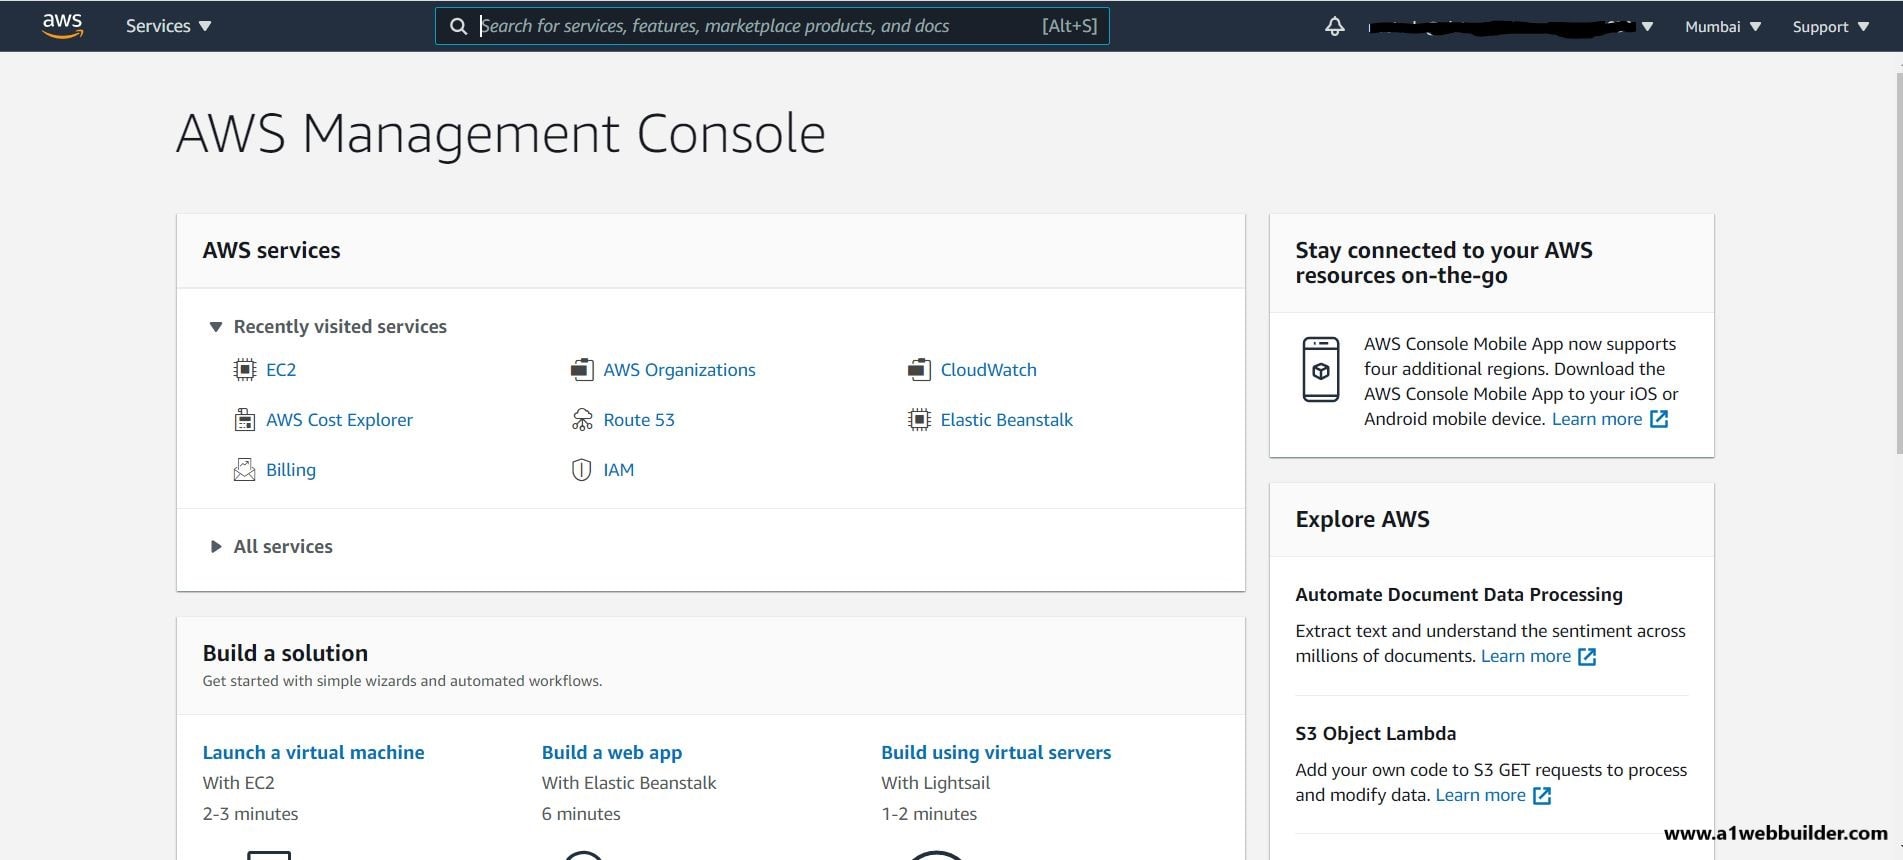
On the top right corner of the AWS dashboard click on the location and select the AWS server closest to you or optionally select any other server for your preference. This gives you an advantage since it will reduce the server response latency when you are hosting your website.
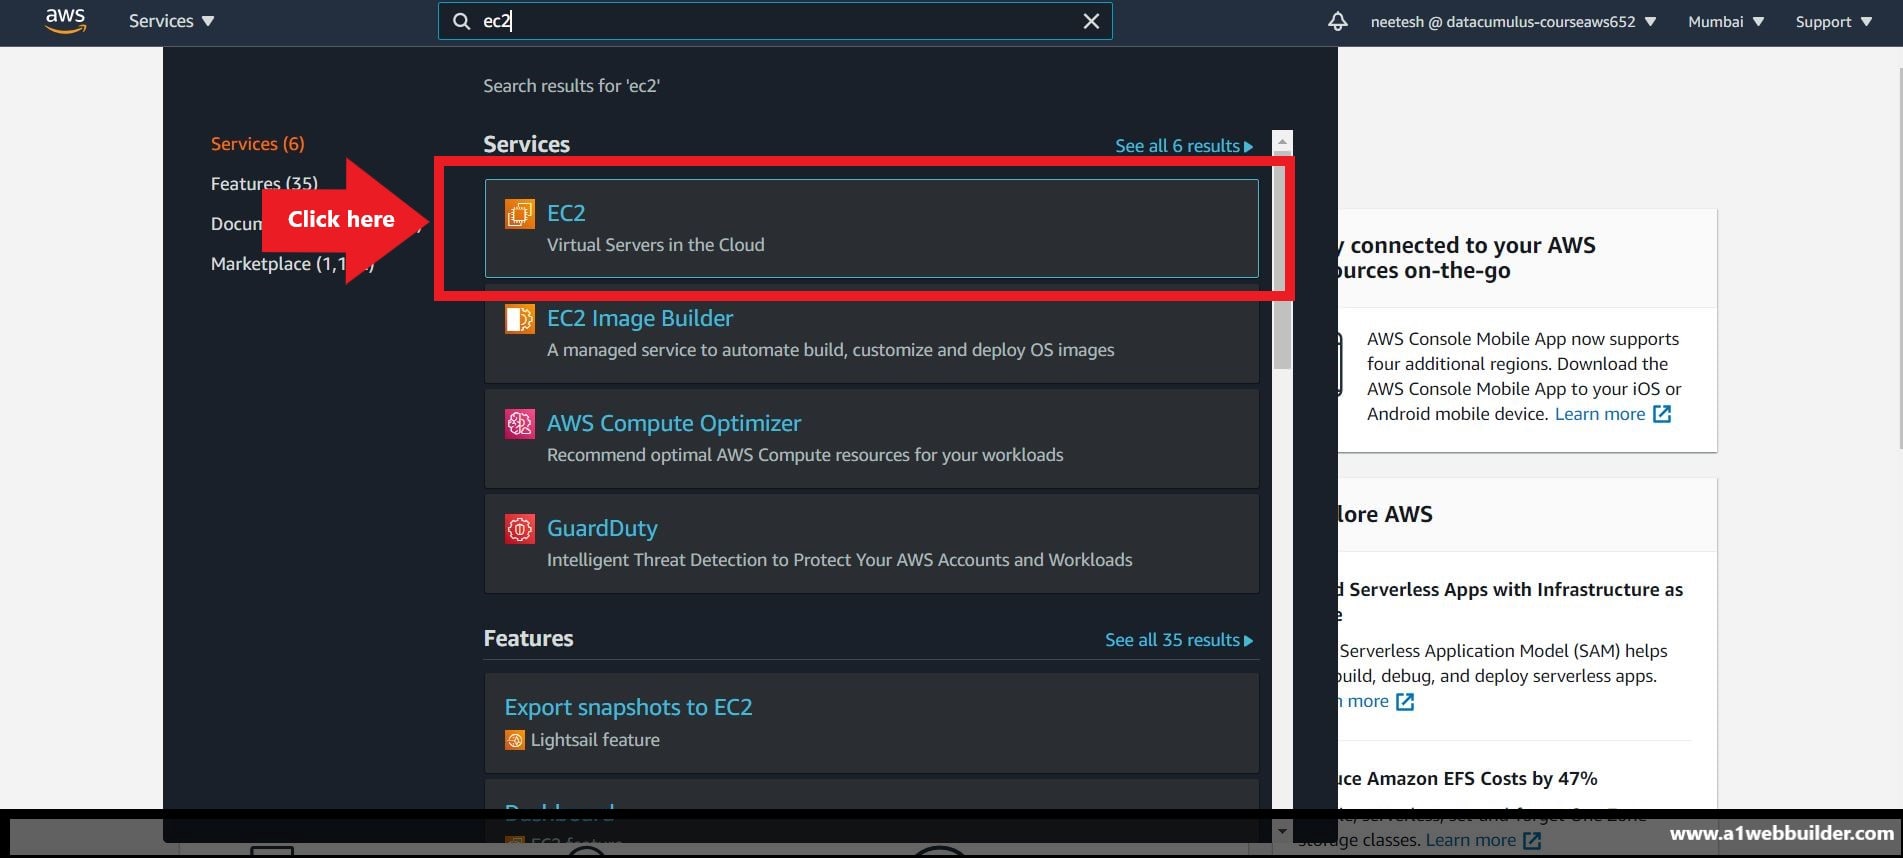
Step 3: Select Ec2 Instance for your WordPress website
On the top bar there is a search field, now type EC2 in this box and it will automatically filter EC2 from the given list. Select the EC2 instance, this will open a new dashboard where you can create/set up, manage, delete your EC2 instances.
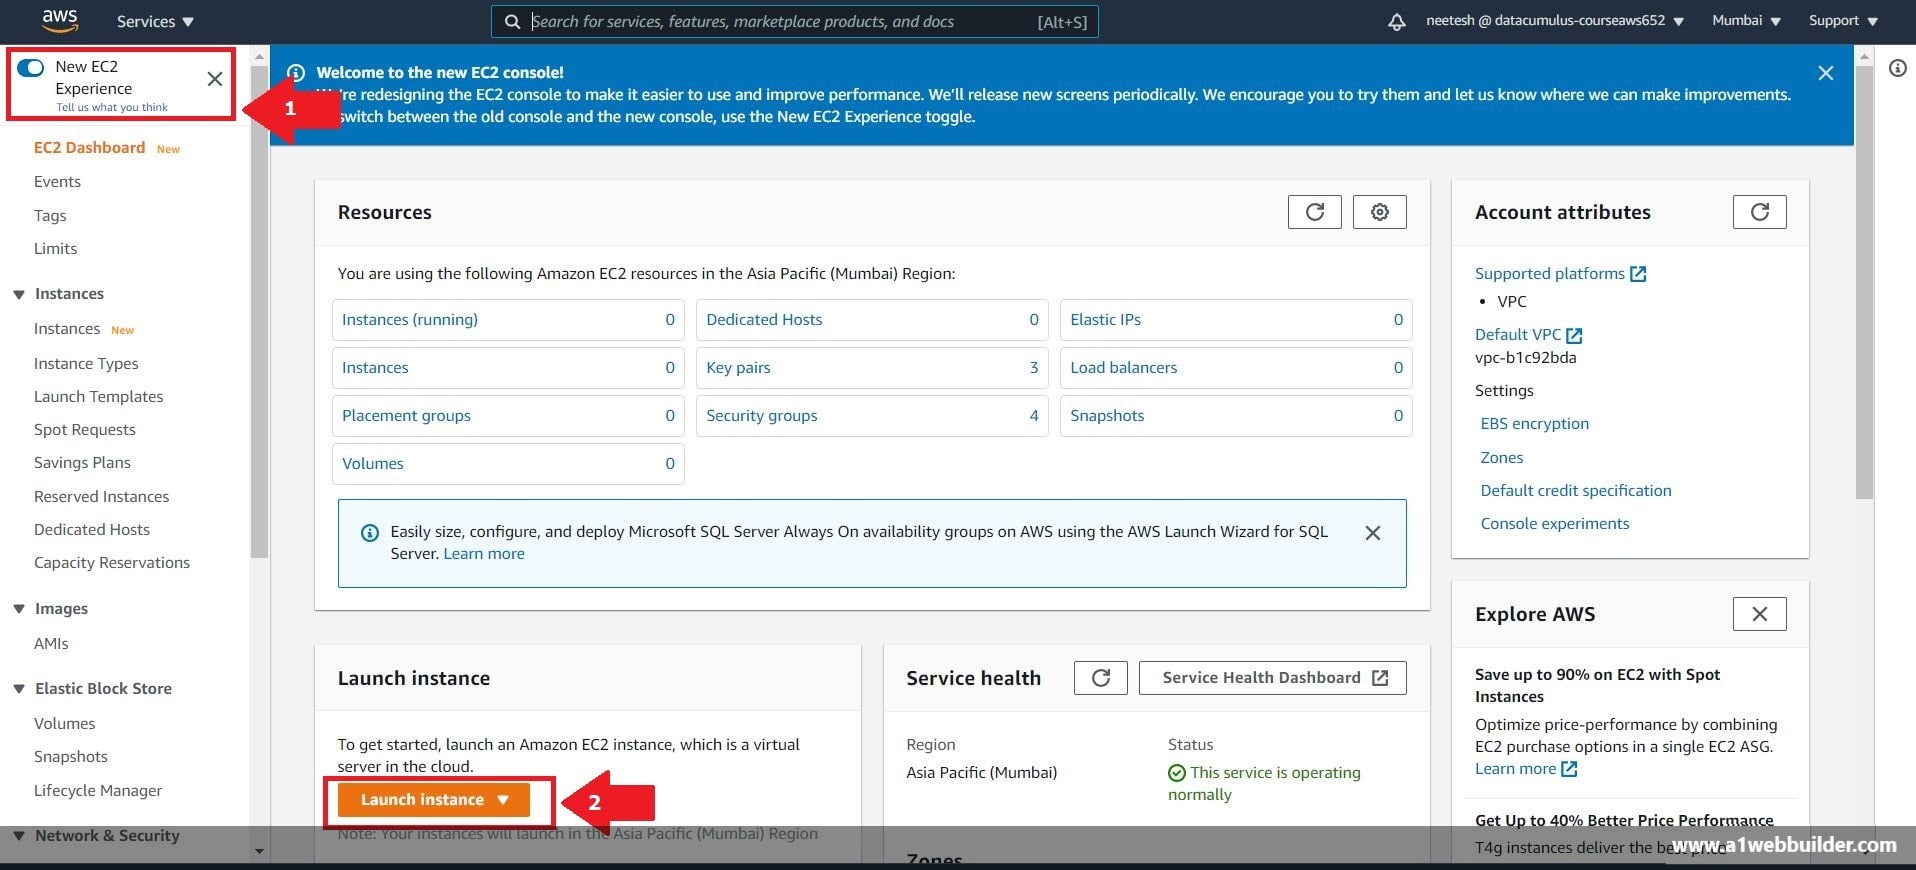
AWS has upgraded its EC2 dashboard to look for a better user experience. Select the radio button to switch between the older and new dashboard version as you require given in step 1.
Once you are done setting your dashboard look click on the Launch Instance button as mentioned in arrow step 2.
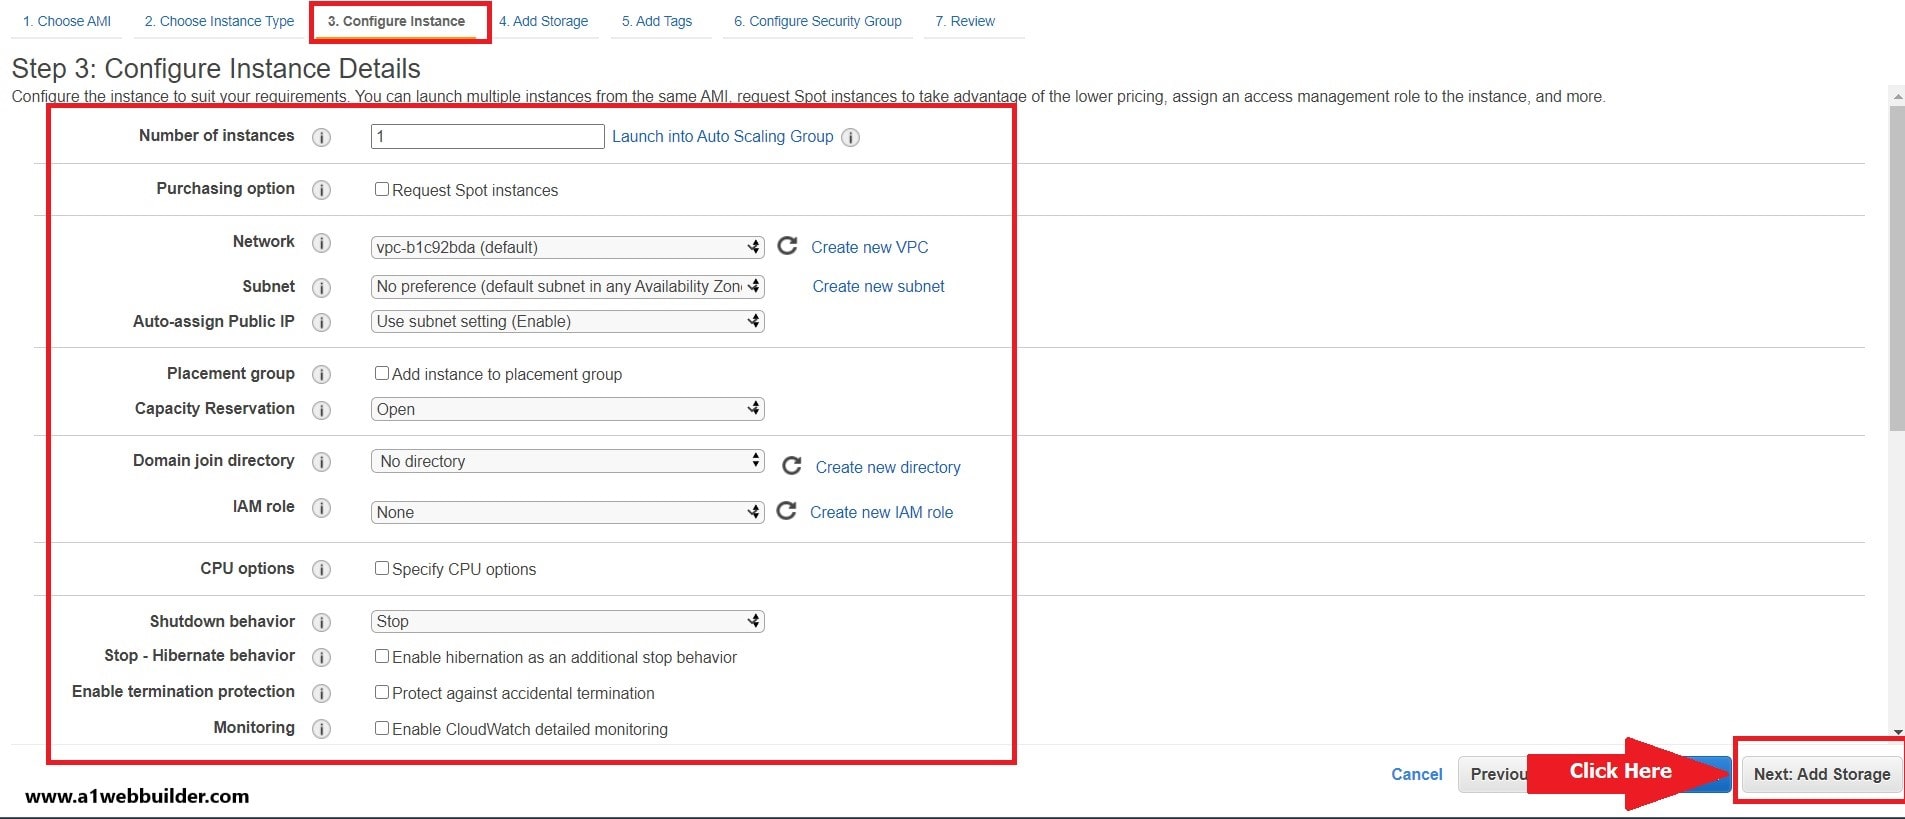
The next tab that is “Configure Instance” will keep the default settings provided by AWS for Instance Configuration Details and click on the “Add storage” Button.
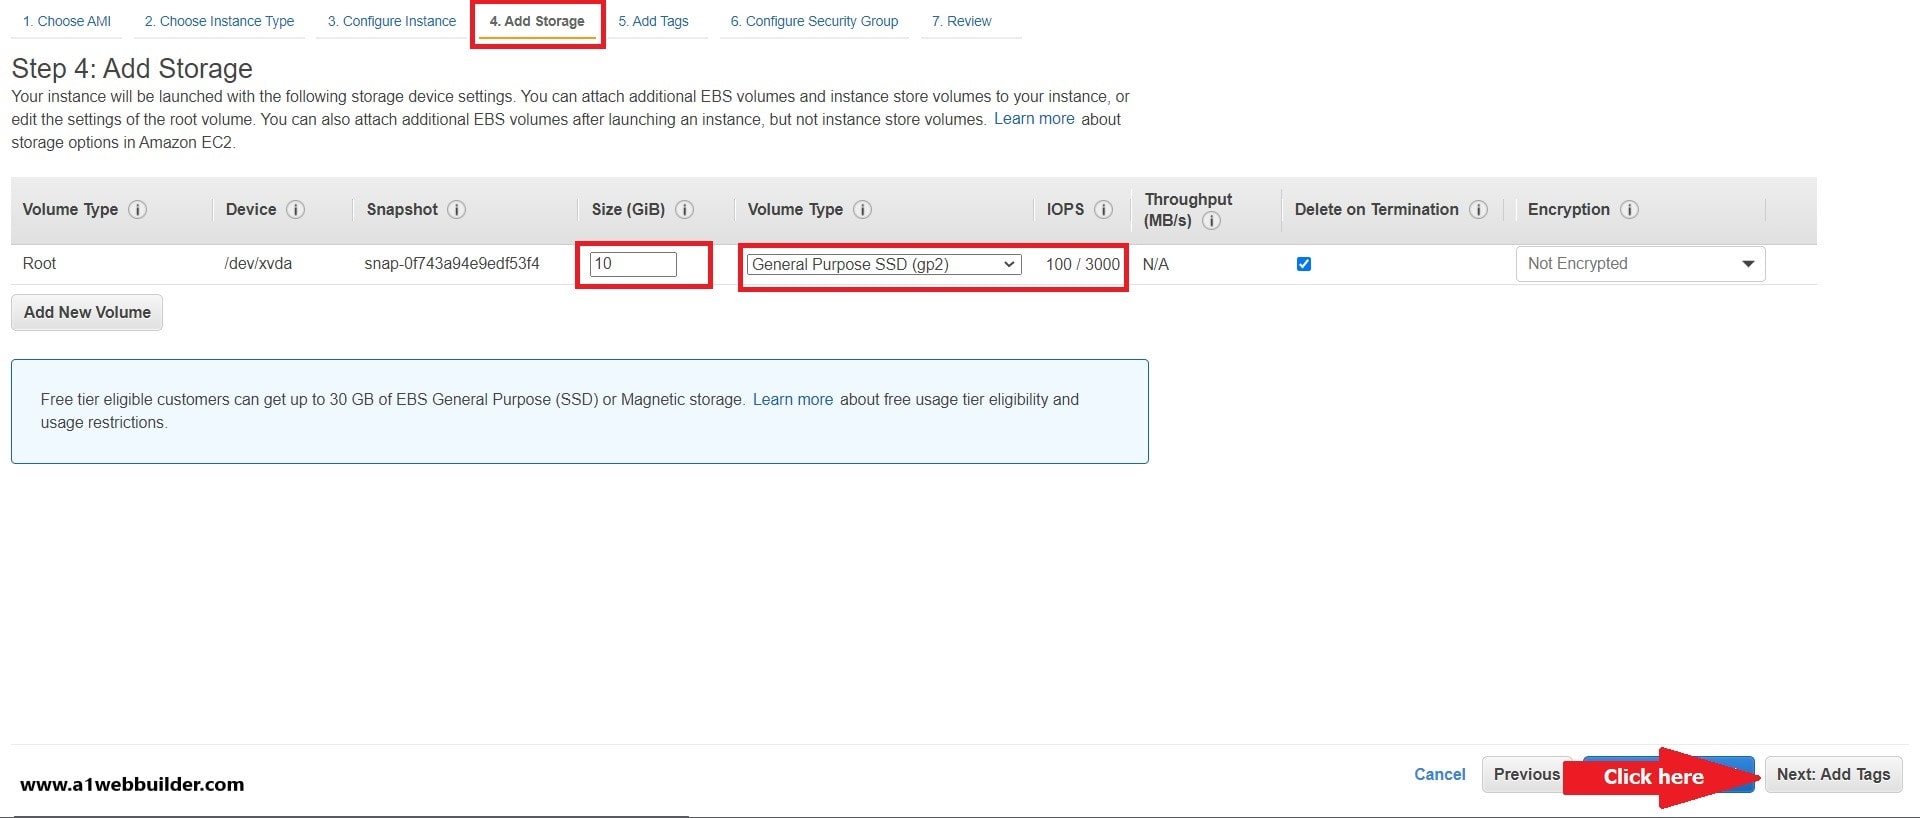
In the “Add Storage” tab you have two options first is Size(Storage Space) needed for your WordPress Website Hosting and the second is “Volume Type”. The Read and write Operation frequency required for the performance and smooth working of the website.
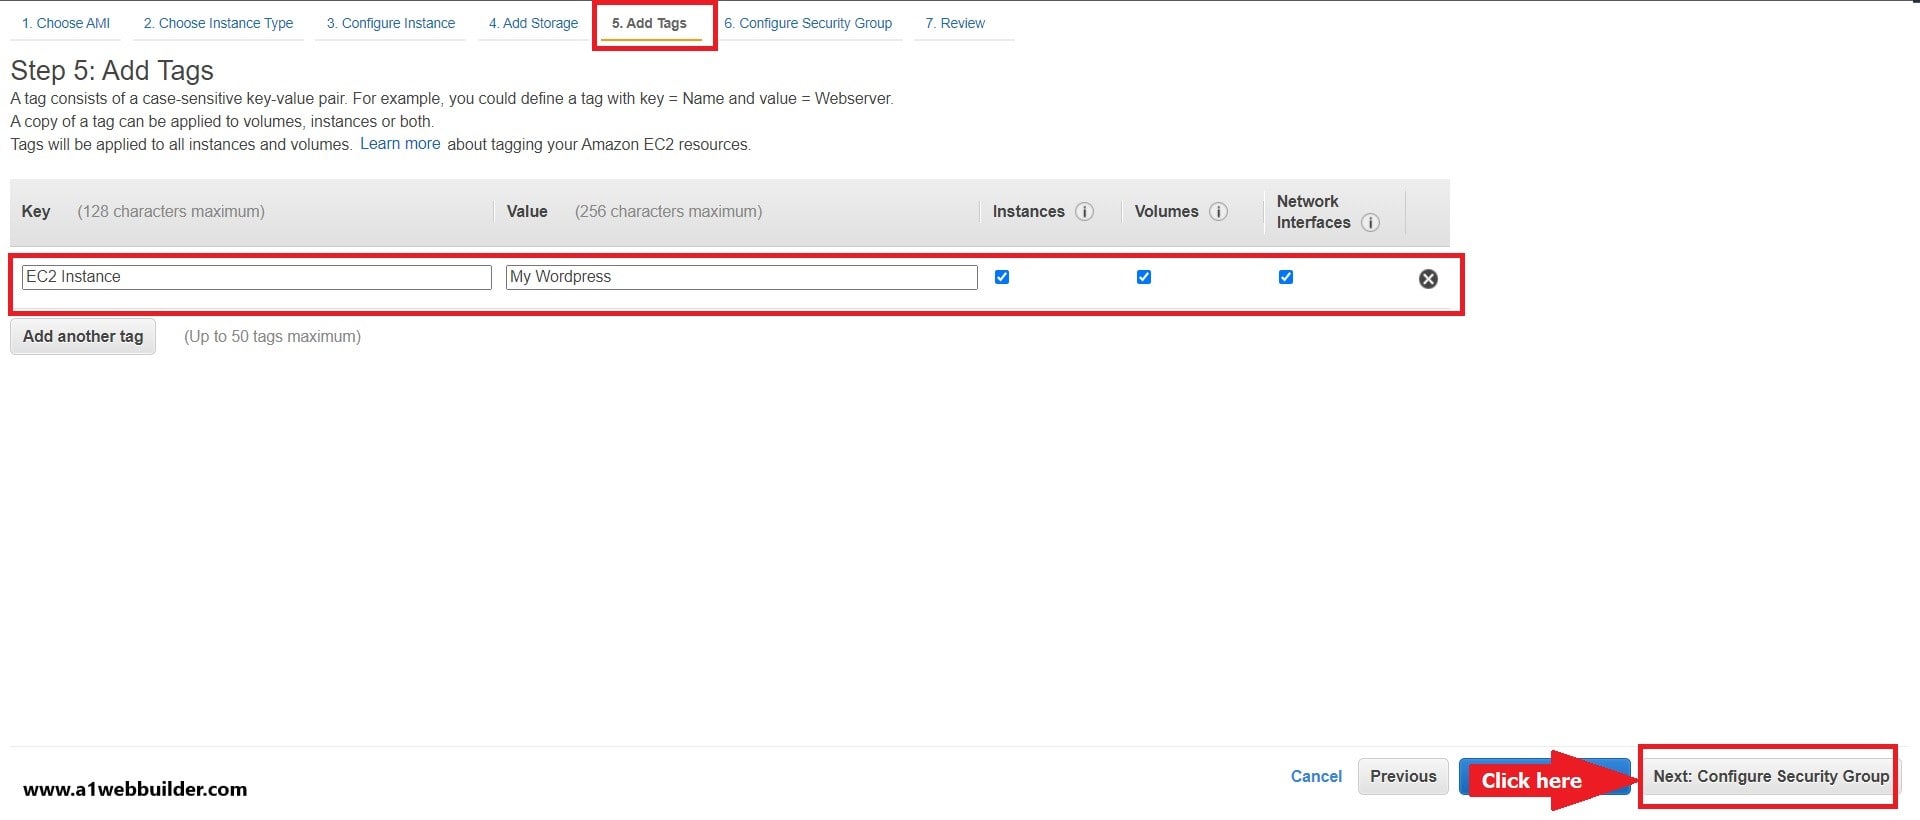
These are default settings given by AWS. You can also change the size and volume type as per your need but this will cost you extra money on how to utilize but is best to be in the free tier and minimize the cost as your business is growing. Next click on the “Add Tags” button
To complete the EC2 instance setup, we need to follow these easy steps to install WordPress on AWS.
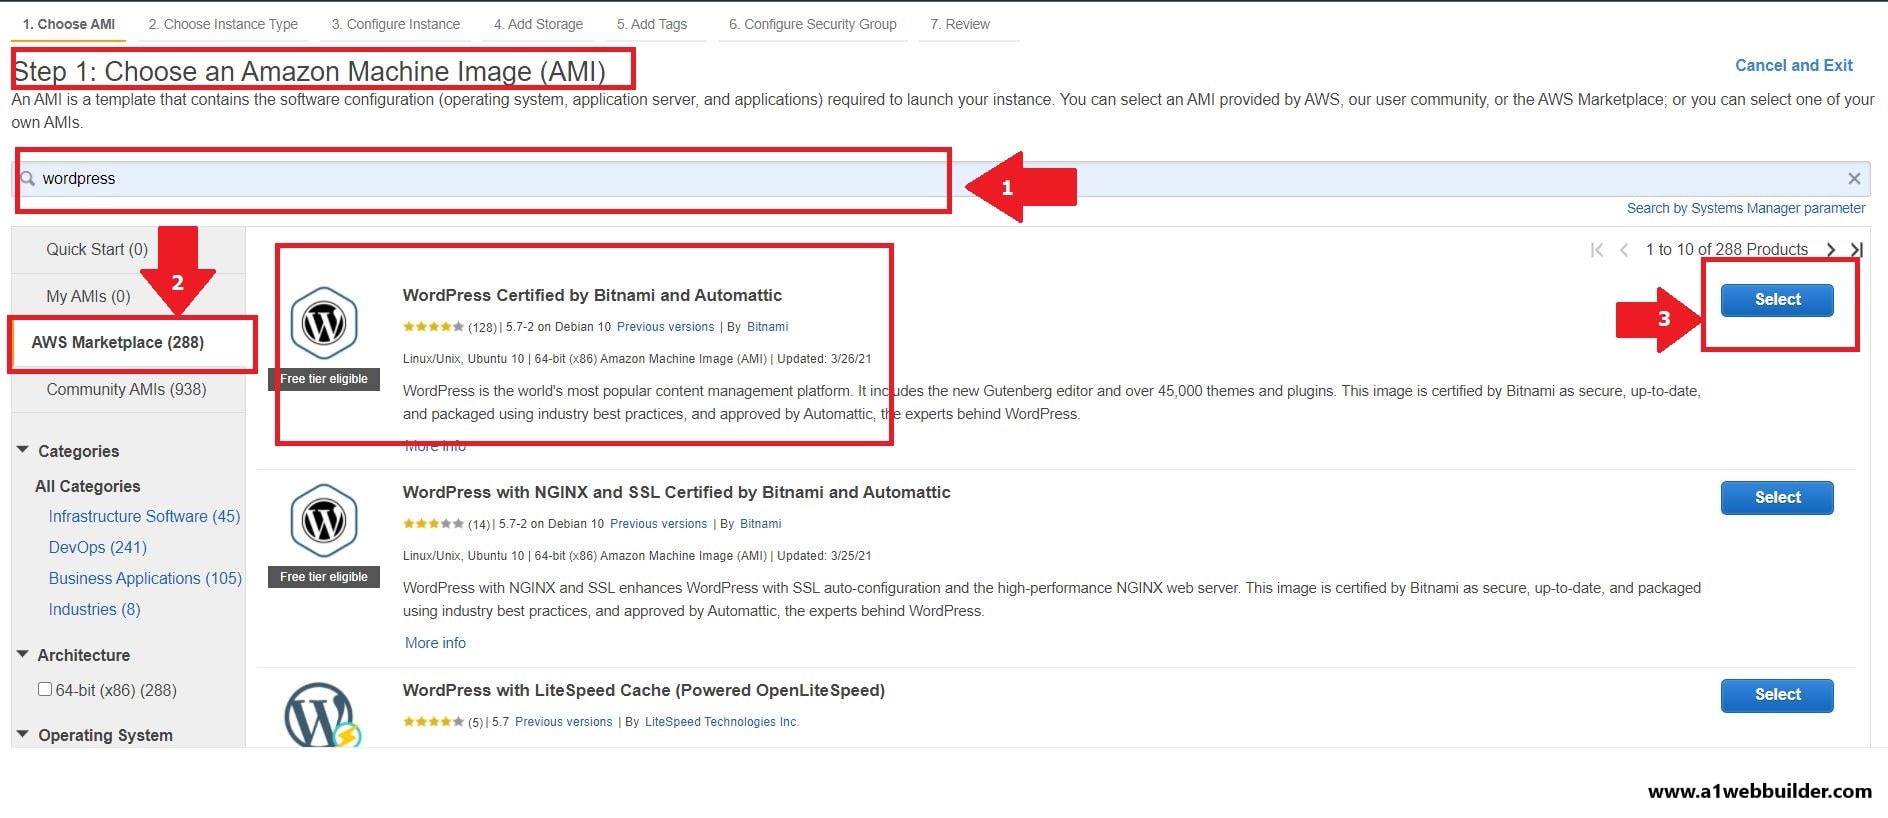
- Click on Choose the AMI (Amazon Machine Image) tab
- In the search box just type “WordPress” and hit enter
- On the left navigation panel select “AWS Marketplace”
- Select “WordPress Certified by Bitnami and Automattic” as your Amazon Machine Image
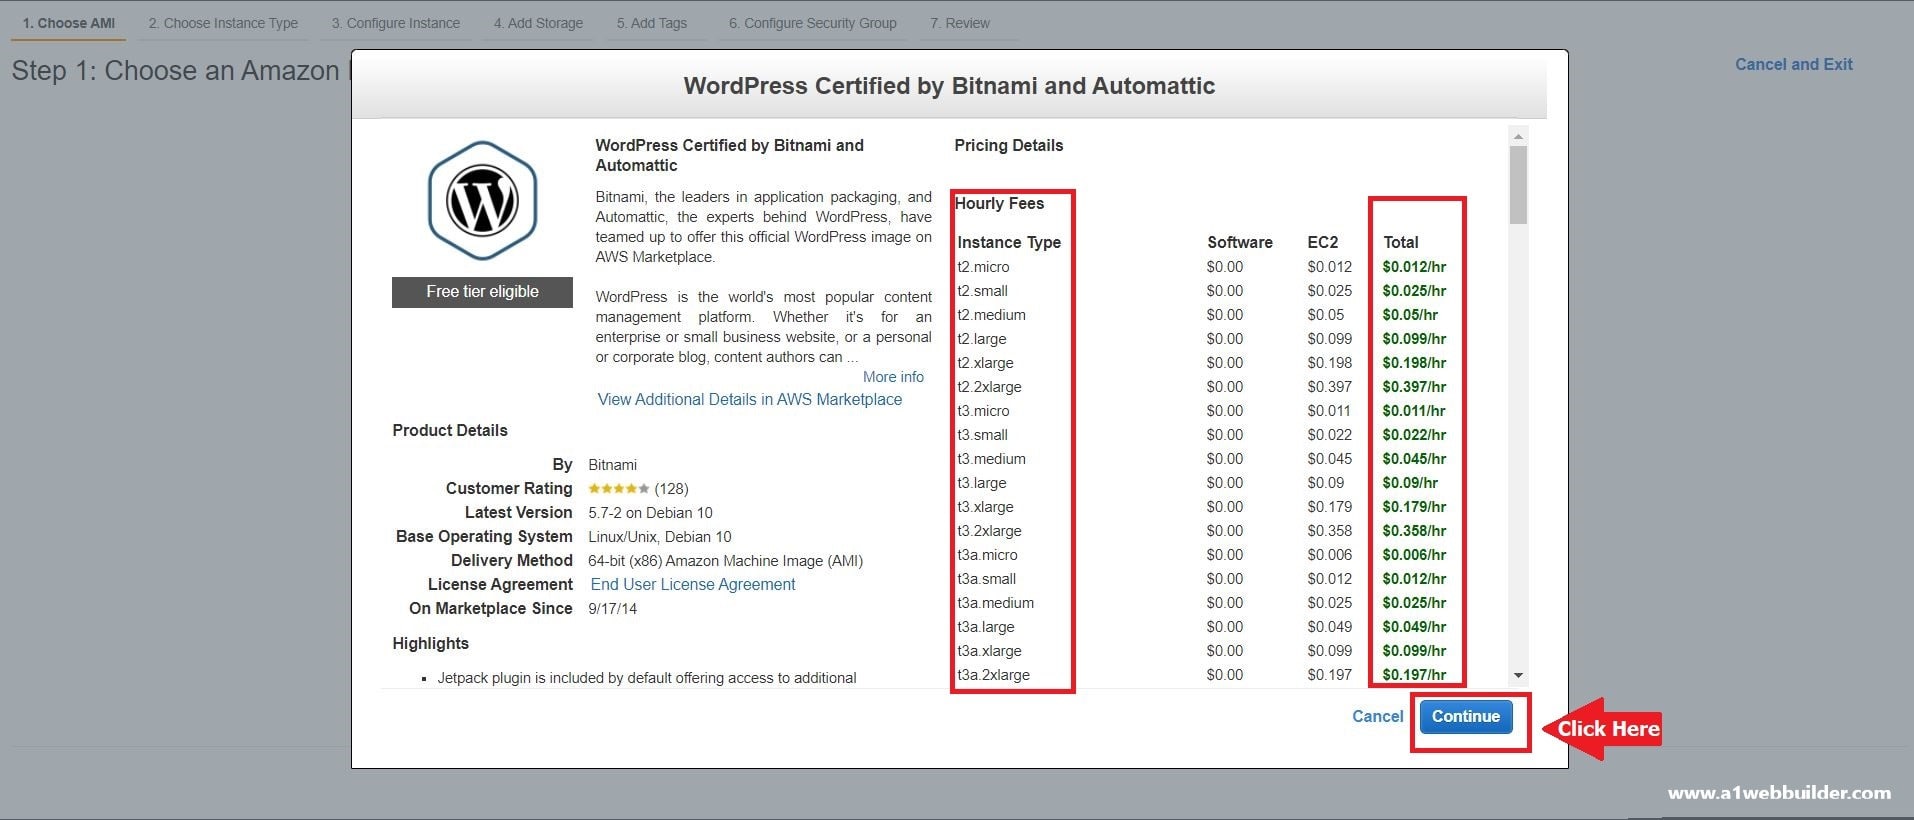
Once the AMI machine is selected you will get a pop-up. This pop-up will give you an overview of the Bitnami WordPress pricing based on the instance type you need to select depending on the requirement or your budget to install WordPress. Click on the continue button to proceed to the next step.
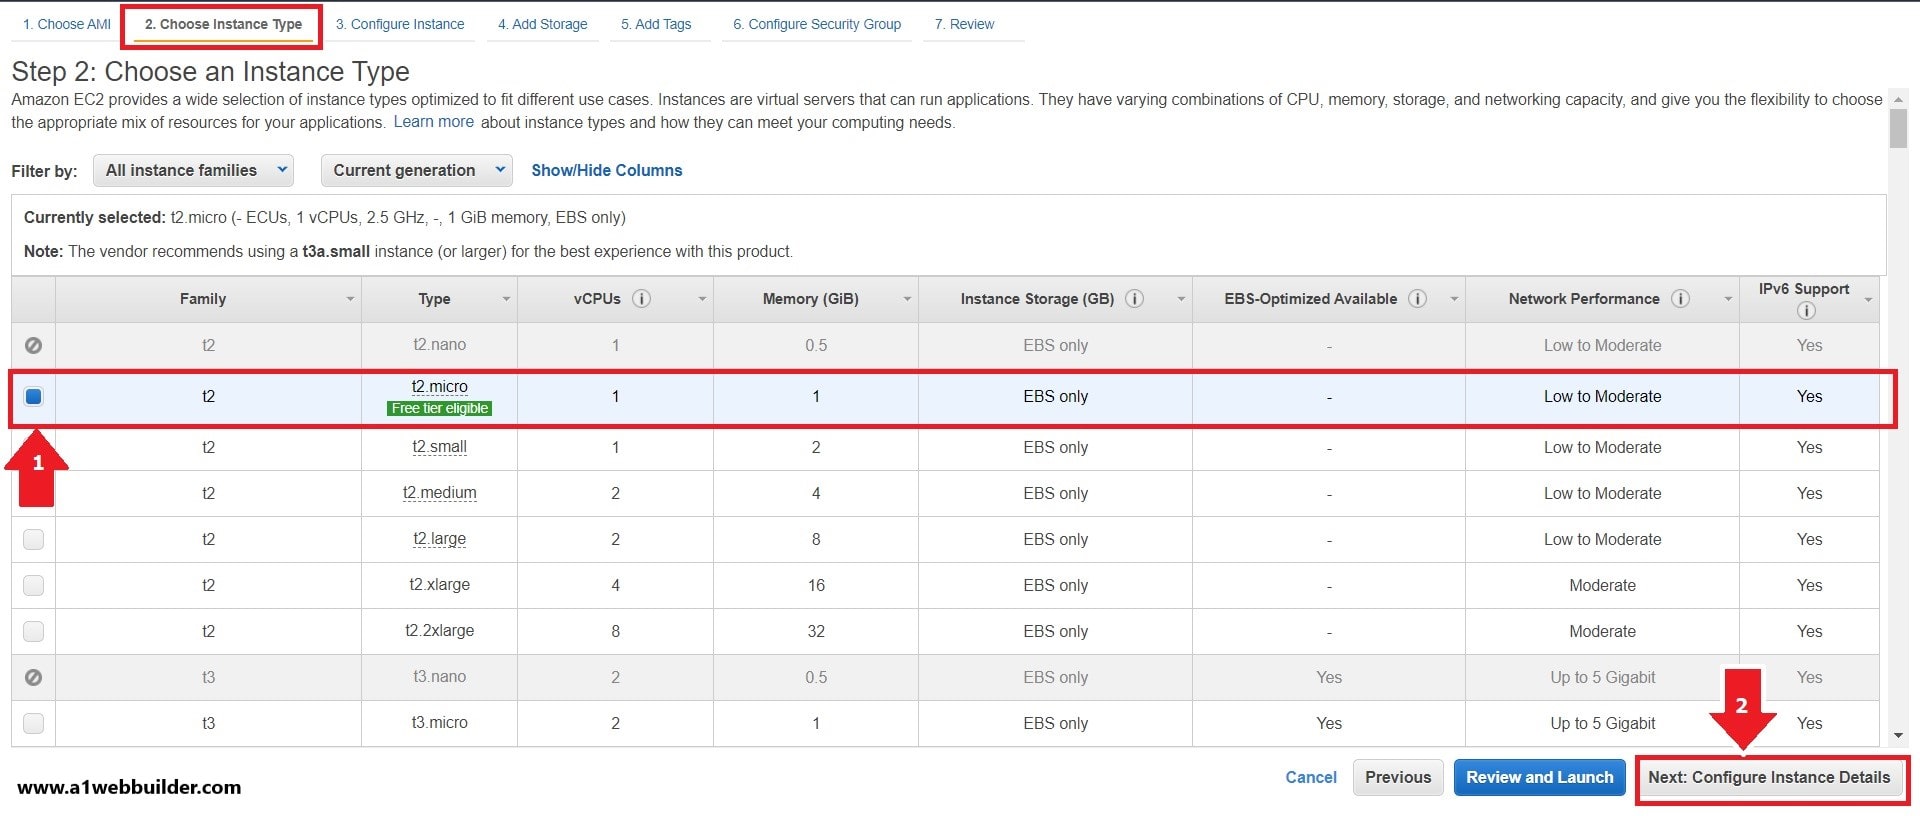
In the Second tab “Choose an Instance Type” select “T2 micro” since this is a free eligible tier and the biggest advantage is it will not charge you any money as long as you remain in this free tier option.
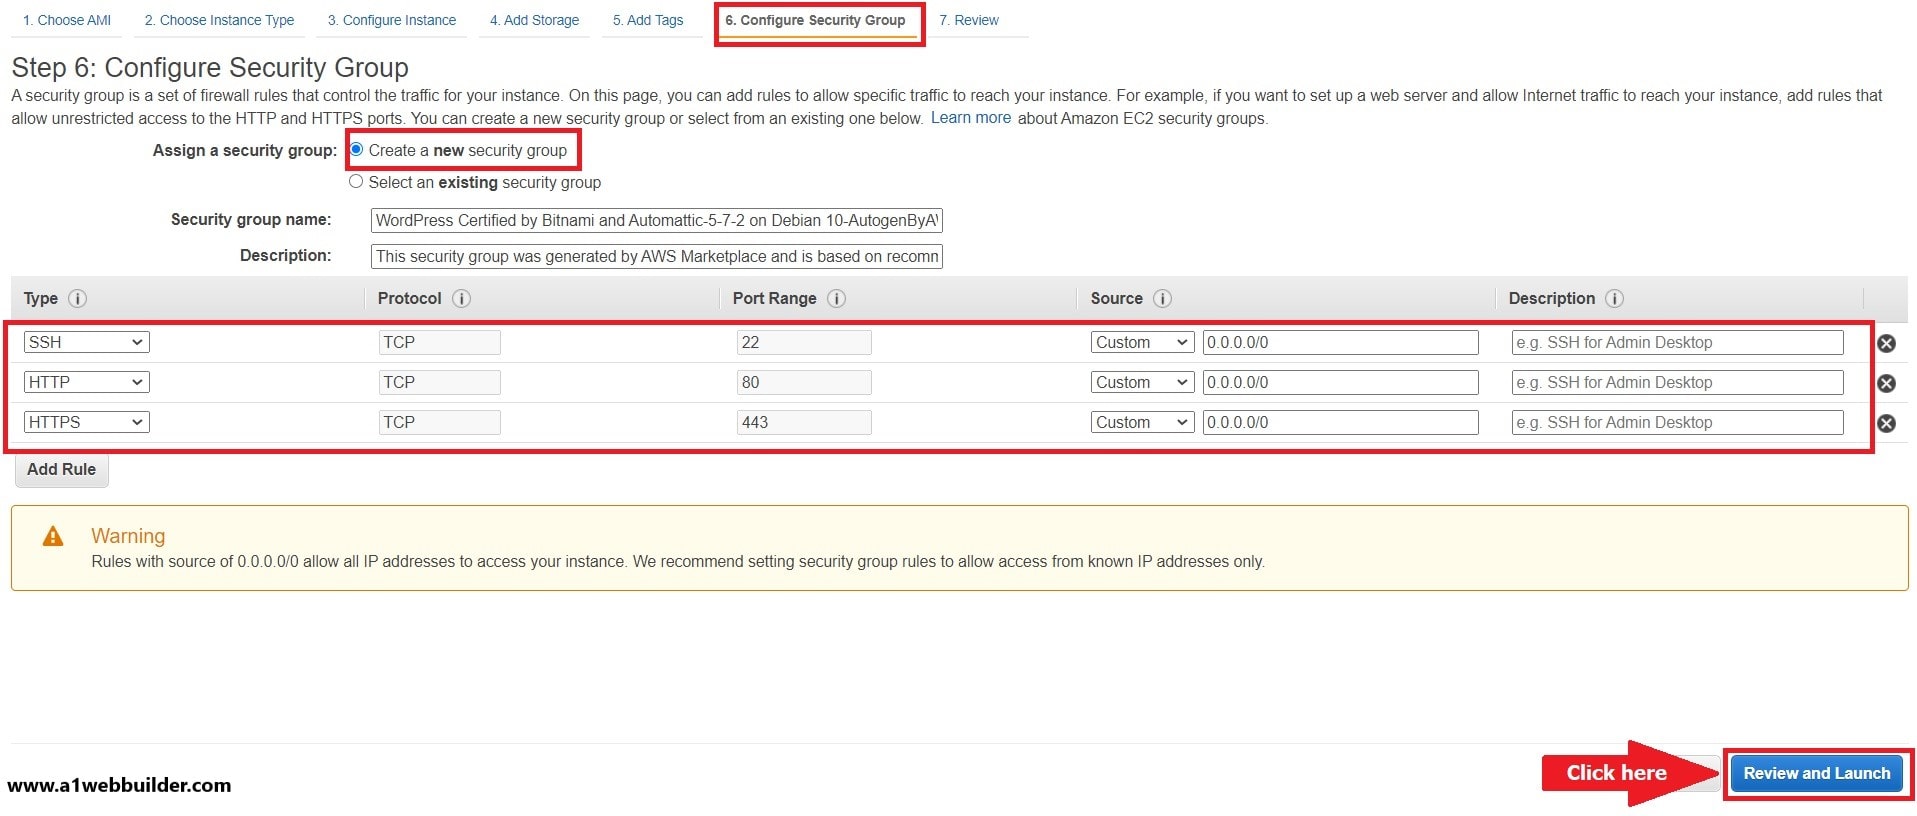
Our Final Step “Configure Security Group” tab is one of the Backbones of AWS Cloud Service and the most important factor of protecting your Website and controlling traffic coming to your Website via EC2 Instances. The security group table is showing you three rows starting with Type that is: SSH, HTTP, and HTTPS.
- SSH: This is used for Linux-based Command Line Prompt to get access to your instances for tweaking your instances and monitor.
- HTTP: it will allow users traffic directly to your website since your EC2 instances can accept HTTP requests.
- HTTPS: It will allow users to redirect to your website with HTTPS requests since your EC2 instances are allowing it.
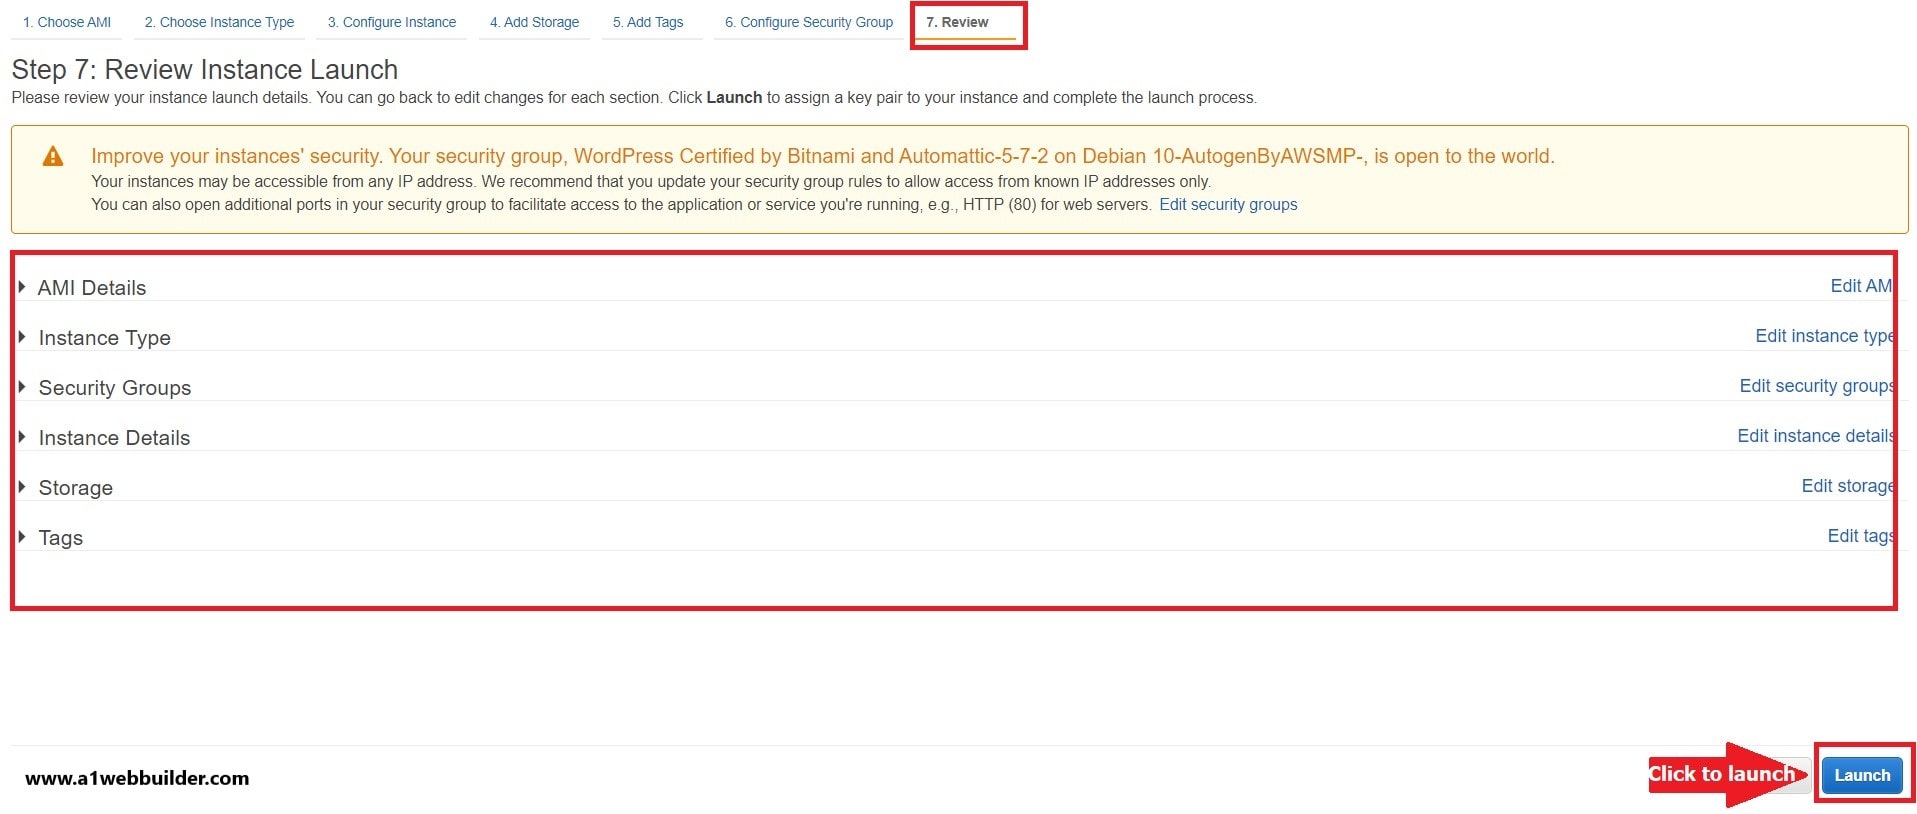
Now let’s keep the default security provided by BITNAMI WordPress Setting and click on the Review and Launch button
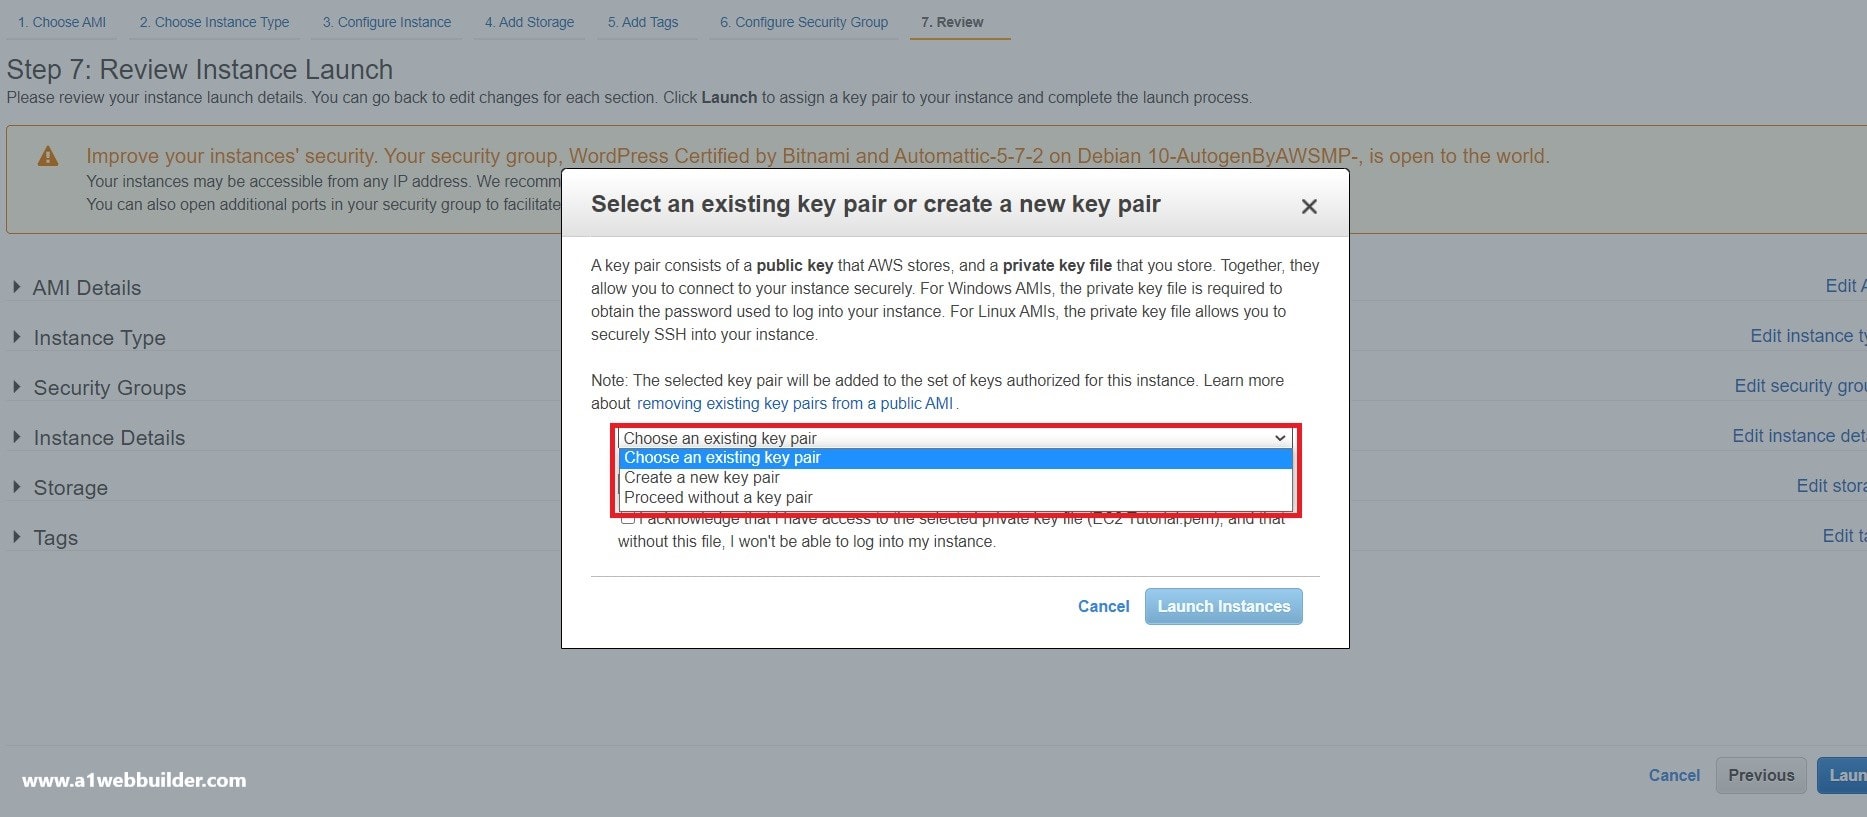
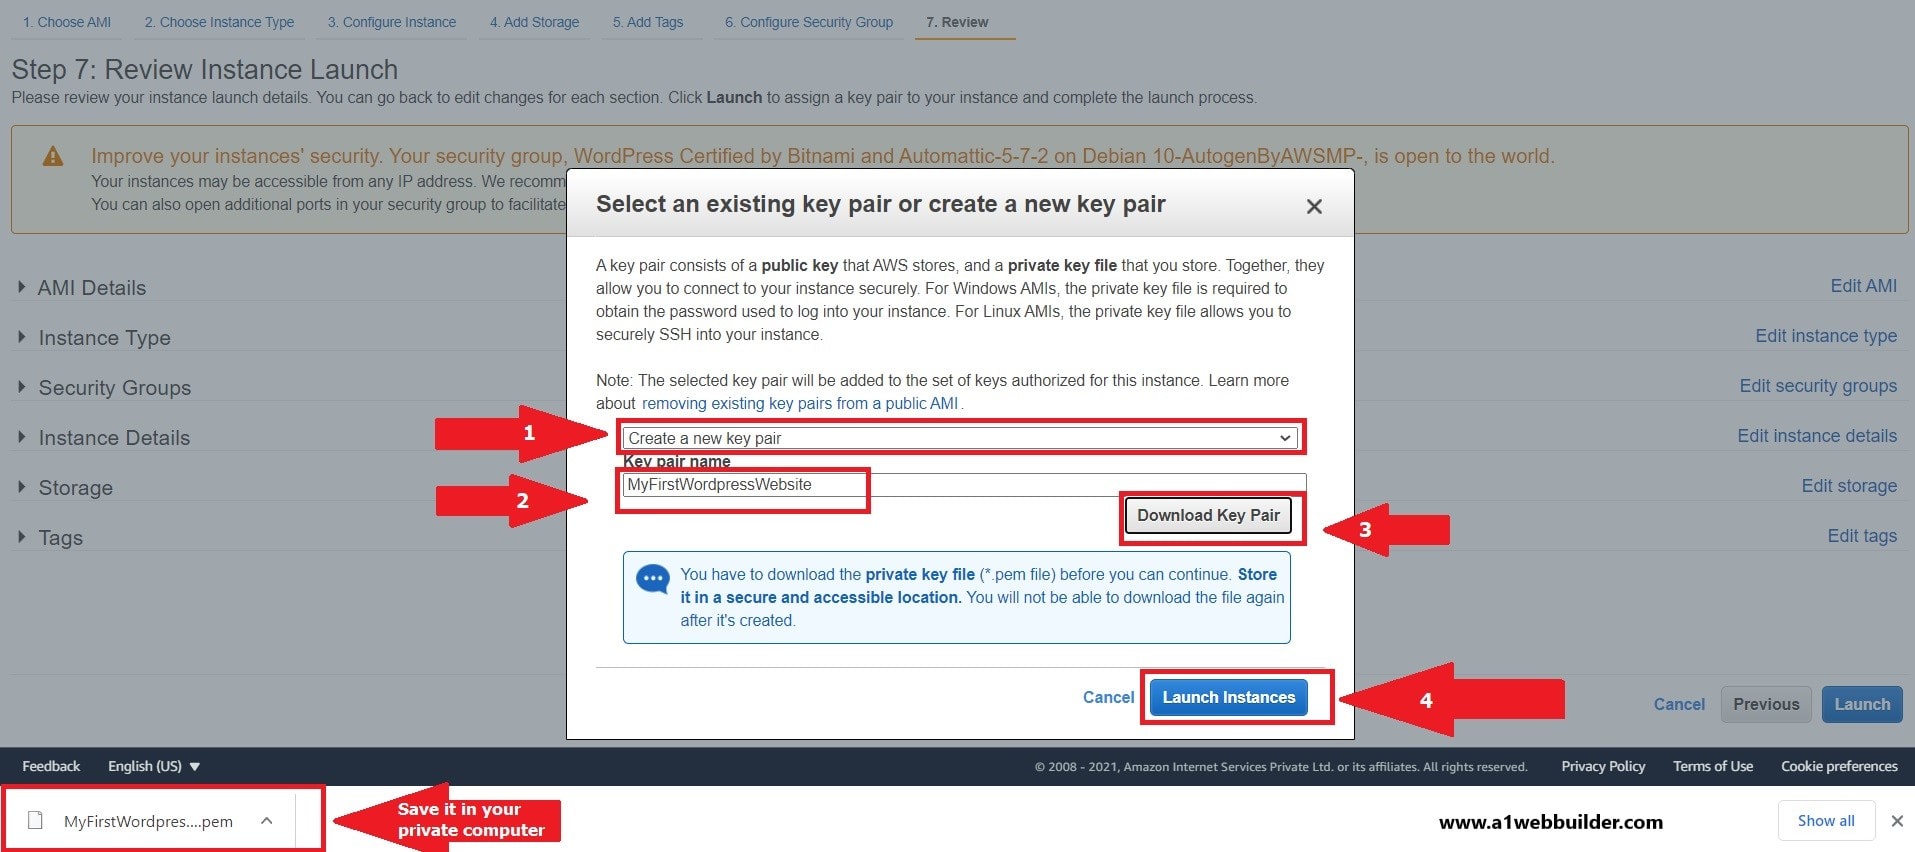
Once you click on the launch button, it will show a pop-up that will ask you to create a new/existing key pair. But what is a key pair? And why do I need a key pair?
Now, select “Create a new key pair ” from the drop-down after this give a name to your Key Pair for example “MyFirstWordpressWebsite”.
“Remember never share your Key-pair file with anyone since they can use this file to hack your instances and destroy your website”
Note
Download KeyPair and keep it safe and secure on your local computer drive and the final step click on the “Launch Instance” button
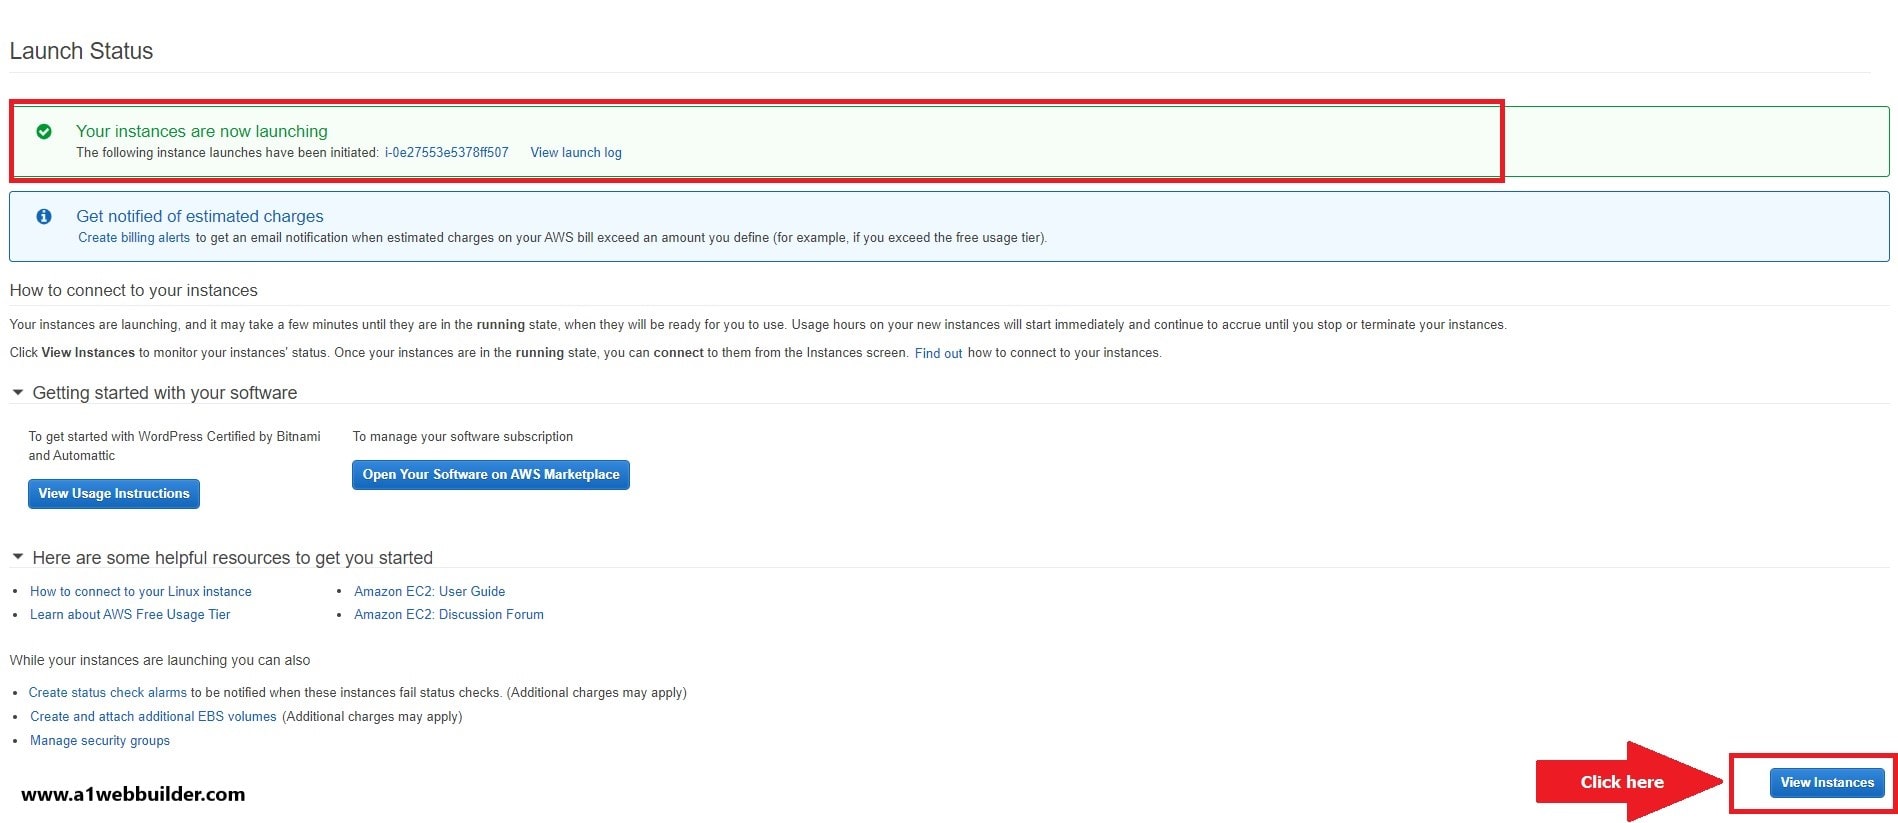
Your EC2 Instance is installed and completed successfully, you can view your WordPress instances by clicking the “View Instances” Button
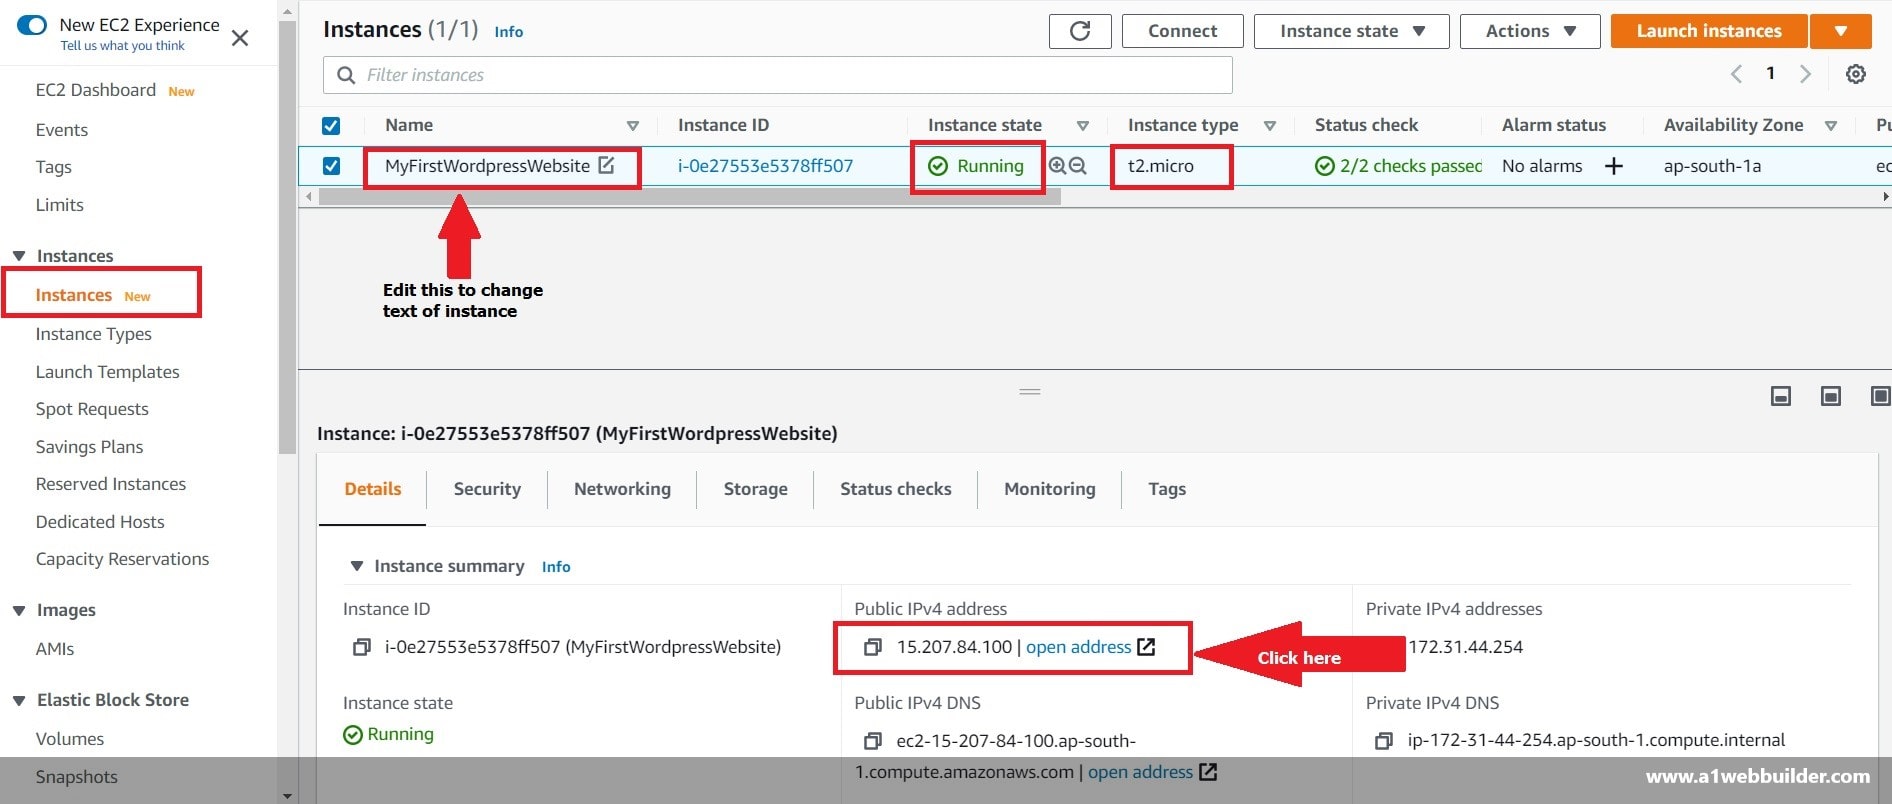
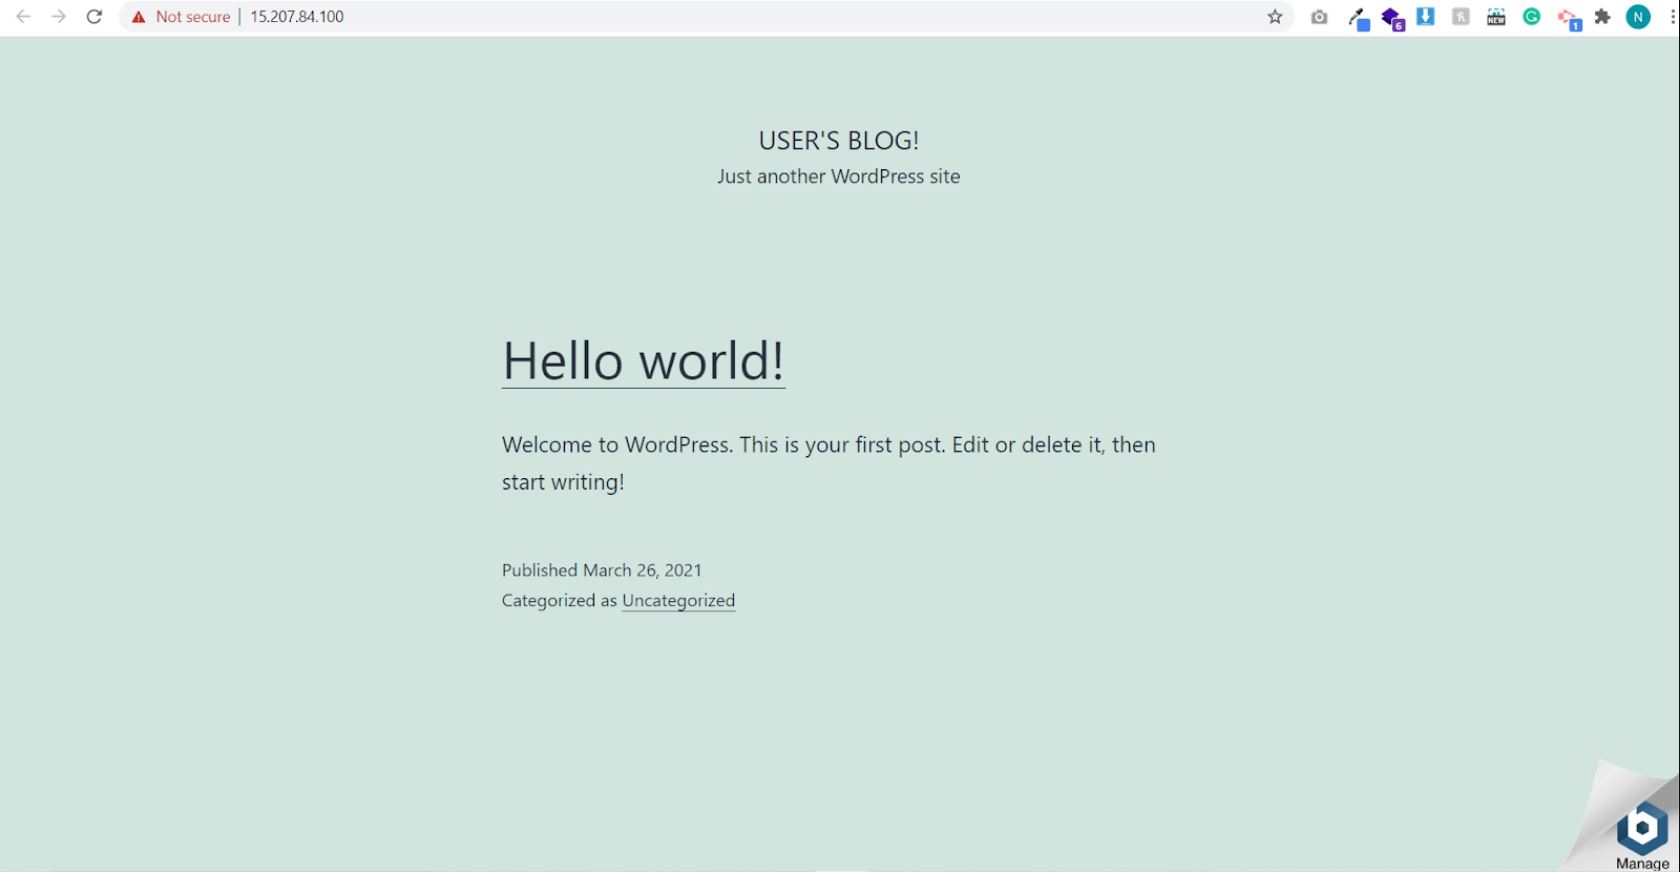
This will open the Instances Dashboard where you can view your recently WordPress instances created. The Instance name can be changed to your preferences by clicking the edit icon. Once your instance is ready it will show as “Running” which means your WordPress website is active and now you can view your fresh installed WordPress website by clicking the Public IP Address generated by AWS EC2 Instances and open this in a new window.
Fabulous, yipppppi……….. !!!!! your WordPress website is Live
We as a team at A1webbuilder are highly skilled and qualified to develop and protect your website with a premium facility and quality service including the industry’s standard. We can deliver your website within your time frame and provide the best result. Feel free to discuss your new project or business goal, call us on +91 7208 328 691, contact us or drop us a mail at info@a1webbuilder.com.


